Thursday, November 14, 2019

The Three C's of Sewing: Curate, Cogitate, Construct


Curate:  Many fabrics curate in my collection for years waiting for the golden opportunity to be part of a great project. I have such an extensive collection of fabric but that doesn't seem to stop me from getting more. Great fabrications need to be snatched up quickly before they are gone! I can't cut into precious fabric until I hear 'a calling' especially when you consider the fact that most can't be replaced.  I think we need to establish a fabric replacement service just like replacement china and silverware.

Pattern: Many patterns curate as well.  I don't need another coat but I wanted to take on the challenge of this Vogue Koos Van Akker coat.  V1277.   It is possible to purchase most 'out of print' patterns on websites like Etsy.  There are a ton of websites.

Cogitate: Now comes the hard part. It could take days or even weeks to select just the right combination of fabrics and notions. Actually, picking out the fabric isn't anywhere near as difficult as deciding on the under structure support and sewing techniques.  Coco Chanel, Armani, Miyake and Ralph Rucci are just a few designers who mastered genius construction techniques.  I want my garment to reflect my own creativity and be beautifully sewn. (That means I will not be following the guide sheet directions in case it wasn't obvious.)
Selecting just the right amount of support in the proper areas is critical. The wrong interfacing could totally destroy the drape of the fabric. I don't want the coat to look like I'm wearing a lamp shade!  Not enough support in stress areas will cause the garment to become distorted. And this pattern has a multitude of bias and cross grain lines that will need support.  In my opinion, stay-stitching will not provide enough support in the tailoring process.  What takes place below the surface is the hallmark of a great garment !  I'm already thinking about using 1/4 inch strips of silk organza. Stitching with an integrated dual feed system is definitely helpful if your machine has it.
Top-stitching around the outer perimeter is suggested in the guide sheet.  This is both decorative and structural. All those circular areas will need some sort of stabilization.  I could hand baste twill tape to the left of the seam allowance.  That way it wouldn't be incorporated into the seam (no bulk in the seam allowance) however it will be secured when you add the top stitching.  Fusible stay tape may also work nicely on smooth fabrics but not on the textured fabrics.  Strips of silk organza would work well on almost any fabric.
Solutions for creativity and construction may be inspired at any time of the day.  Ideas may cross your mind when you are on the treadmill at the gym or as soon as your head hits the pillow.  Hint: keep a pad next to the bed.  I don't start the cut out process until I have all my construction ideas in place.

The Seams: The seams are to be sewn with the fabric wrong sides together (like a French seam) with the exposed seam allowances on the right side of the jacket. The seam allowances must be trimmed down to a scant 1/4 inch for the 1/2 wide bias strip to straddle and cover the raw edges. Hopefully you wont have any stray whiskers peaking out!  Never, never, never. Then you need to decide whether you will pin or baste the bias binding.  We certainly don't want any 'kinks' or whiskers. Why can't we sew the seams in the traditional manner?  I'm not sure yet. ( I found the answer when I read and re-read the guide sheet instructions about five times. It wasn't the least bit obvious until I figured out what they were doing with the pocket opening.)
My concern with the suggested guide sheet technique is this; the bulk from the seam allowance below the bias may cause the seaming to look and feel like the ridge of a spine.  If I sew the seams in the traditional manner with the seam allowances on the wrong side they can be trimmed down to 3/8 inch. Press and pound the seams.  The 'grading' process of the seam allowances will result in a flatter and smoother appearance.  Placement of the bias binding over the seam will be much more forgiving.

Under structure: Deciding on the type of interfacing, underlining or batting is another major cogitation.  That depends on whether I pick coating weight fabrics, suit weight woolens, synthetics or quilting cottons. I have tested at least 3 different interfacing products. I refer to 'Grid Weft' as an interfacing product rather than a true interfacing because the function is somewhat different.  Grid Weft can 'beef up' a fabric that lacks body.  Because each fabric is a different weave, weight and/or texture I have selected a different interfacing respectively.


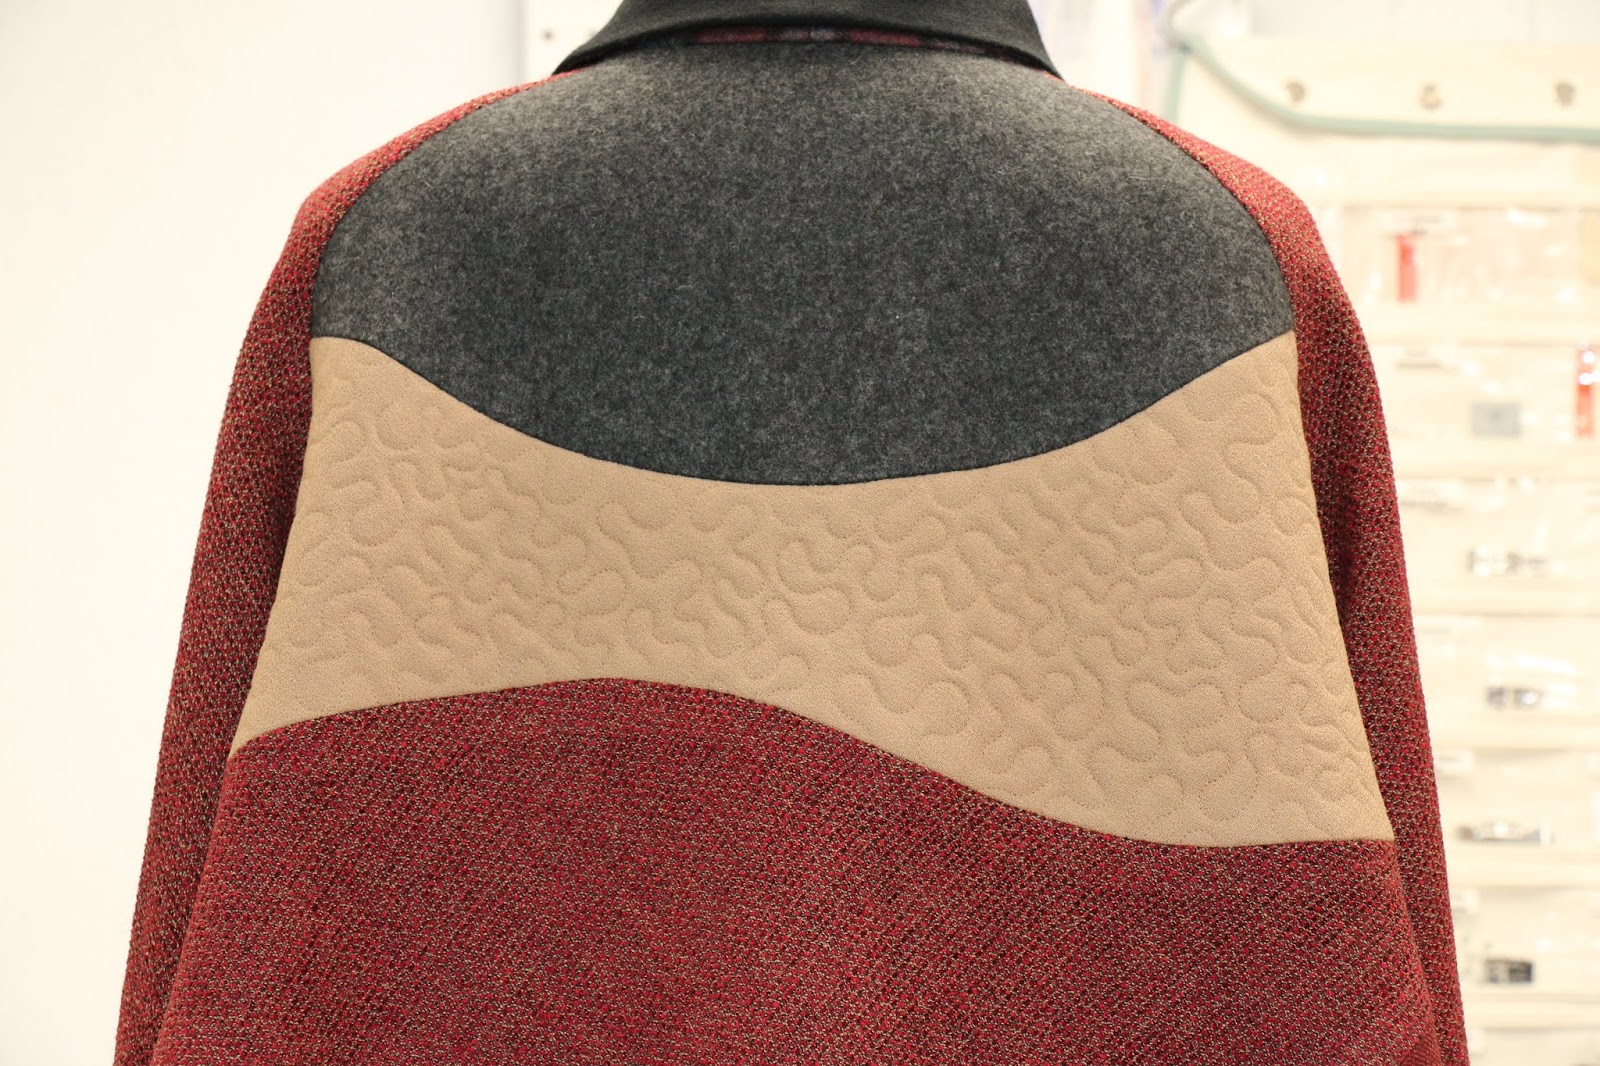
This is the sequence I have chosen working from the bottom of the coat to the top of back.  (The dark tan is showing up lighter and brighter on my computer screen.)  Most fabrics are from Sawyer Brook, Clinton MA.  Marona wool plaid # 18-1102 from the 2019 fall collection. Red Maple wool  has been curating since 2002, and Crimson Fancy is from 2000.  (Note- They are moving to Marlborough ! )
The dark tan wool crepe was from a delightful store called Clearbrook Woolen down in Clearbrook,Virginia.  Sadly, they retired.
The dark grey melton coating is from Banksville in Connecticut.

Pattern piece #1 is positioned as #5 on the back of the jacket.  I stipple quilted this on my Bernina longarm as yardage before I cut it out.  Warning !  Quilting a fabric really changes the drape. This will work out fine simply because of the location on the jacket.  I wouldn't want this much body for an entire coat.   That's often the problem with quilted jackets; they can be very stiff looking. After quilting just this one pattern piece I seriously doubt I will quilt the jacket as the guide sheet directions suggest.
(Quilted items remind me of an I LOVE LUCY episode. Lucy was trying to save money by sewing a dress. She cut the carpet by mistake.  She sewed the dress and modeled it for Ethel.  Ethel laughed hysterically.  She looked like a lampshade. )


Pattern piece #2 is positioned as the #4 on the jacket back.  (The pattern numbers and the positioning is majorly confusing. It took quite a while to interpret the pattern envelope.)  This fabric is droopy so I  fused 'Grid-Weft' .  Note:  I always use contrasting thread to baste my notches and pocket lines.


I decided not to sew the seams (as per guide sheet directions) and have the raw edges exposed on the right side.  I have sewn them in the traditional manner with raw edges on inside.  Now that the segments are together I have decided not to add the bias strips as well.  I'm thinking that may be over-kill.  A little too busy in my opinion.  Perhaps bias strips would be more appealing on cotton weight fabrics.  I'm thinking of adding a 'hand-picked' Sashiko stitch.
(using the Babylock Sashiko machine) I will test out the technique on scrap fabric first to see if I like it.

The Sleeves:  I chose the nubby red, gold and black textured tweed for the sleeves because the wool was more pliable and lofty.  I fused 'Grid Weft' to add a touch of body because this fabric has a fairly heavy drape.  I felt this soft texture would work out better for a sleeve which needs to bend.  The guide sheet suggests quilting the sleeve.  Naturally I tested this process on scrap before plunging into my yardage.  I tried 3 different colors of thread.  None of them showed up. I honestly don't feel the texture enhances the appearance of the fabric.  The texture created by the quilting stitches just made the fabric appear lumpy.  I have decided against quilting the sleeves.  If I had chosen the solid rust color the stitching may have shown up better but I was more concerned about the sleeve looking stiff.  That was the trade-off.  Besides, this design has so much going on it really didn't need more enhancement.   I used flannel backed satin lining for the sleeves so it will be easier to slide on and off.

Pocket Welts:  I noticed the welt pocket is going through BOTH layers of this coat because the jacket is designed to be reversible.  That will be a challenging pocket to stitch through both layers plus through the bias binding trim.  This is starting to sound like it may be quite bulky !? Initially I was contemplating using flannel as an inter-lining.   Hmmm. 💭 That would really add bulk to that welt pocket area.  Pockets definitely need a support structure to prevent being stretched out of shape.  Silk organza to the rescue!
Anyone who has sewn a traditional pocket welt with side seams knows that side seams can have major bulk issues.   This is where a Japanese welt comes to the rescue so I know I will not follow guide sheet directions for this step.

The ANSWER was in the Pocket!  And the pocket is their last step if you are following the guide sheet directions!  I just noticed there are no pocket linings.  Hmmm.  💭 This is unusual. The inside of the pocket is already finished because the seams were sewn in reverse!  OK.  Got it!  But.... the pocket opening goes through both coat layers so the coat can be worn reversible.  They simply added a patch pocket over the opening. Experience tells me this will be very challenging and very bulky.  I do not plan on wearing the solid reverse side so I'm going to eliminate this construction concept and prepare a pocket lining between the two layers.  Now I can sew all my seams in the traditional manner, grade my seam allowances and place the bias over a smoother seam.  I altered the pocket welt pattern to a Japanese welt to eliminate that nasty bulk in the side seams.
What have I learned ?  Years ago I would have opened up the guide sheet and started sewing.  I simply did whatever the directions indicated.  No, I didn't take the time to read and question each step of the process. The pattern company does not know what fabric you are sewing on therefore they can't possibly suggest different techniques.  Thank goodness I took the time to figure out what they were planning on for this coat pattern.  Now I can make a few changes based on my fabric selection.  I would be very upset with myself if I ruined the project and wasted the fabric. That's what works for me.

Creative Opportunities:
On the sleeve (#2) take notice there are lines of machine quilting.  If I use a solid fabric here then I might be able to pre-quilt the yardage on my Bernina Q-24 quilting frame using the Q-matic automation.  Hmmm.  Decisions, decisions.  A busy fabric with too much print or texture will not showcase beautiful quilting.  Pre-quilting the fabric stiffens the body for sure.  Across the back works out just fine because that is where you would want some structure.  It doesn't interfere with the overall drape.


And here is the full back view.

The pattern does not have a button closure.   I added a loop and this leather woven knot button.   

On the back neck line I had to get a little creative.  To cover the seam allowance I used a strip of Petersham (similar to grosgrain ribbon) .  This is typical in knit t-shirts to strengthen the neckline.


Finally, it is done in time for cold weather.

Due to the irregular pattern shapes there is quite a bit of waste.  Time to turn all those large remnant scraps into a skirt.

Thursday, September 5, 2019

Seams Before we had Sergers!


Long before we were able to purchase home overlock sergers we somehow managed to sew beautiful garments with French seams, 'mock' flat-fell, bound edges, or turned and stitched (clean finish) seam allowances etc,  This is how we sewed in the 60's,70's and 80's because sewing machines were mechanical and very simple. When the first serger overlock machines became available for home sewing I was thrilled how fast and efficient the process was.  I thought this was just wonderful because it trimmed the seam allowance and finished the edges like commercial clothing.  I bought my first serger in 1982.  They started to become a little more common in the late 80's and early 90's.  They weren't exactly cheap (like microwaves) so it took a while for all the money conscious sewing people to take the plunge.  In those days people sewed to save money. Today I sew because I can make garments that look and fit nicer than any ready to wear.

My friends and colleagues always teased me that I could wear my clothes inside out.  That's because I grew up sewing with French seams and bound seams. That's what we had to do.  I still think they are so clean and neat.  They wash beautifully.  Garments simply look better and last longer.  I use them almost exclusively on batiste, lawn, lightweight silks, lightweight cotton and linen.  I find myself avoiding the serger because all that thread adds bulk to the seam finish and isn't very attractive on fine fabrics. I do use my serger quite a bit for knits or for finishing bulky fabrics like corduroy and denim.

A 'Bound' seam finish is great on an unlined jacket.

I used a light weight cotton batiste for the one side seam because I have an opening at the waist where the belt tie slips through the opening.

Lightly starch your fabric with Best Press or Terial Magic before you cut your bias strips.  A little stiffness will make the bias strips much easier to cut and will feed nicely through the bias binder. Cut the strips 15/16th wide.  The starch will help control the stretching of the bias. I use my Featherweight bias binder on my Viking Epic and Berninas (with shank adapter).


I even used a French seam for the princess dart seam lines. Yes, you can do a French seam on a curve providing the curve is gentle.

I use the Bernina foot #57 with the right side flange for nice straight stitches.


You are viewing the inside of the
garment.


This is Burda pattern 3737.


Cut out your facing pieces and the fusible interfacing pieces but DO NOT FUSE them together.  Place right sides together. Stitch a 3/8 inch seam allowance on the edge to be finished.  Do NOT use the iron yet.  With the seam allowance toward the fusible facing under stitch the seam to keep the interfacing from rolling toward the fabric. Now, fold the fusible interfacing toward the wrong side of the fabric.  Now fuse the two together.  The edge is now turned and fused with no visible stitches on the fabric side.
 Using cotton organdy would be another great option as an interfacing.

This is a Liberty Fabric from Fabrics.com
Pattern: Sycamore
Fiber: Linen


I pre washed the linen.  When I removed the fabric from the dryer it barely needed ironing.  Not all linen fabric wrinkles a lot.  Liberty quality is amazing.

Note:  A simple linen dress with this quality fabric could cost $200.  This cost me $40.   Sewing can still be very economical!  And they don't sell linen dresses in any big box store!


Wrap dresses are wonderful in the summer time.  No buttons, no zippers.  Fast and easy.


Friday, June 28, 2019

My 'Orca whale' Dress


I named this my 'Orca whale' dress. The black and white contrast is definitely eye-catching. I'm always amazed by the vibrant colors we find in animals, tropical fish, birds and flowers.


This is Vogue DKNY 1408


Hemline Considerations: 
1.)  Lengthen the dress 3-4 inches for those of us who are 'baby boomers' and choose not to wear short dresses.   I need 38 inches for it to meet my knee cap.  Sometimes the photo on the envelope isn't that obvious. 

2.) Quite frequently the circumference of the hemline is indicated on the back of the pattern envelope or sometime on the guide sheet.   I couldn't find the measurements printed anywhere. The pattern only showed back length.  It turned out to measure 154 inches. If the fabric drapes really well the fullness isn't quite as pronounced.  I'm not sure about this much fullness.

Fabrics:
The pattern suggests using fabrics with stretch.  That can mean stable knits or fabrics with lycra. I can definitely see this in a wool crepe.
This black and white cotton sateen has very little lycra which is why it is softer and has fairly good drape.  Lycra doesn't allow the fabric to accept contours and drape softly so I tend to avoid fabrics with lycra for these reasons.  I came across this lacy print in my collection.  I felt the design echoed the skirt fullness.
(Both of these beautiful fabrics were purchased at Banksville Fabrics in Norwalk, Connecticut.  Just give them a call and they will gladly send appropriate samples to your doorstep.) 

 This particular pattern is designed to be fully lined.  I typically do NOT cut out a lining at the same time as I cut the fabric for the garment.  The reason I choose to delay cutting the lining is because I need to give myself time to evaluate whether or not the construction process is meeting my expectations.  If I don't like how things are going I can abandon the project.  Sometimes I am disappointed with the fit or style.  If things are going well then I will cut out the lining.  This is the best reason for making a 'Muslin' of a garment first.  You need to account for fit, style and construction techniques.

I did make the lining.  There were separate lining pieces which meant things would go faster.  I used cotton batiste.   I normally sew French seams on my linings because they are so clean looking .  I also used a french seam below the zipper opening using the technique that I developed for French Seams with a vent.

Hemline Finish:  What to do with a circular hemline?


This is a full circle hemline like a round tablecloth.  That typically presents issues of rippling as you go against the grain.  Also, if you turn the hemline up more than ONE inch the hemline will probably echo ripples to the public side.
For garments that will be machine washed I prefer to sew a 1/2" folded machine stitched hemline for durability.   I have two concerns with this approach:  #1. the fabric may be too bulky.  #2.)  I don't want to stop to alternate thread color for each segment.

I decided to think outside the box this time;  a contrast bias strip will add a decorative design element with less bulk than a turned and stitched hemline.  I used a lightweight shirting stripe.  I  prefer to stitch from the public side rather than on the edge of the bias strip.  The feed dogs help to ease fullness on the underside plus the quality of the straight stitch is usually slightly better.  I also use a top stitching needle for a nicer stitch.

Would I make this again?  Yes, with a few changes.  I found the fit and design very flattering.

My personal changes: 
#1.  Reduce the fullness of the skirt a little.
#2. Use coordinating fabrics with a softer contrast.
#3. Stabilize the neckline and armholes with a 1/4 inch strip of silk organza to prevent bias grain areas from stretching.


Friday, May 31, 2019

Another Butterick 6208 with Tucks.

Here we go again.  Another Butterick 6208 pattern!  I have several tops and dresses from this pattern.  Tucks are really popular in so many retail stores.  I have used cotton lawn, light weight linen, broad cloth and rayon.  All of these natural fibers will take a beautiful press.

These gorgeous buttons are from the Button and Notion store located in Rockville Centre, Long Island.  They have the most beautiful buttons!


This is a very fluid rayon fabric from Sawyer Brook (Clinton, MA)   Most of my fabrics curate for a while.   I rarely use fabrics as soon as I purchase them.

This beautiful linen and cotton blend came from Banksville fabrics in Connecticut.  They will gladly mail samples.  Great staff!   I need to get back to the button store and find some cute buttons for this dress.
I used Totally Stable fusible paper to space my tucks.  Please look at photos on older post.   March 8 and March 15, 2019.

I am very fortunate to have the integrated dual feed system in my Berninas.   I find the dual feed system produces smoother top stitching.   I used the Bernina #57 foot with the right side flange to create perfectly straight tucks.  Love those feet!

Summer sewing means using my Singer Featherweight Bias Binder.


For me, summer sewing usually means bound seam finishes and french seams.  I rarely put linings into summer weight clothing so I want my seam finishes to be durable and attractive.


 I used a cotton lawn for the seam finishes. The bias binder is Singer #160359 with a Bernina shank adapter. 


These short shank binders work beautifully on many computer embroidery machines.  I have used it on this Bernina 830LE,  the Viking Epic and my Bernina 790 plus with flawless success.


To stabilize the neckline I used a strip of silk organza.


First I starched the cotton lawn with Terial Magic.  Starching the fabric before you cut the bias strips keeps the fabric from stretching as much.  The stabilizer also allows the bias strips to feed more evenly into the bias binder. Make sure the strips are 15/16th wide to feed accurately into the binder.
 The bias binder is a wonderful accessory to finish off the raw edges.

This is Vogue 1180 wrap dress (Betty Jackson).  The fabric is a very soft and pliable cotton twill print.

Wrap style dresses are fast and easy.  No buttons, no zippers.  Just a belt tie. 


This knit top with a square neckline is also Vogue 1180.

I'm not sure if I like a square neckline combined with a round neckline. 

The tan knit fabric is from Emma One Sock.  They have beautiful quality knits! 


I sewed this knit top using a 2 needle/ 4 thread overlock stitch.
The hemline was sewn using the Baby Lock Cover Stitch machine.

Friday, March 15, 2019

Transferring Tuck Lines With Fusible Paper

There must be a faster method that is accurate and safe for fine fabric.   I figured it out ! 

I just finished Butterick 6208 in my last post.   I used the traditional method of  'hand basting' each tuck line with contrasting thread.  It takes time to mark each line and then run a basting thread.  The results are great and that is important to me.  So many people do NOT want to hand baste.  I have tried using water soluble pens and chalk. They often leave a 'hot mess' on fine fabrics.  As soon as the steam from the iron makes contact with those lines they either disappear or stain the fabric.  So, you better get it right on the first try or accept the fact you will be starting over. 

I developed a NEW system using Sulky Totally Stable fusible paper to mark my lines.  This fusible paper is safe on silk charmeuse and other fine fabrics.  My ruler is Quilters Select.  It has the non-slip coating which keeps it from moving on the paper.   I cut one inch wide strips and fused them very close together on the fabric.  Look closely.  They are placed so close it looks like I drew a pencil line on the paper.  I DO NOT have to mark anything on my fabric. 

I machine stitched a basting line between the strips.  The basting thread should be a strong contrast for best visibility.  Initially I was just going to draw pencil lines on the paper and machine baste on the pencil lines.  The problem with that technique is the length of the stitch.   If you perforate the paper with a tiny stitch the paper will tear away easily.  Basting stitches are large making it difficult to tear the paper. The large basting stitches are easy to remove after all tucks have been sewn.
By using one inch wide strips you completely eliminate the tearing process plus you can re-fuse the strips a few more times!  Yeah!


chambray linen
After all the basting lines are machine sewn remove all the strips of  Totally Stable paper.  They can be reused a few times. 
Use your steam iron to press each tuck .  The basting lines will not disappear from the iron steam.  The contrast thread is your fold line.   For absolutely perfect tucks I use  Bernina foot #57 with the side flange.  (all my thread tails will be inserted manually into the tuck with a needle) .  Do not clip your threads or the tuck could open up.


Butterick 6208 uses a pattern overlay which is a great method.  Nice and accurate.

I'm ready for summer!

Friday, March 8, 2019

Butterick 6208 Tunic with French Seams and Side Vents


 I made this sleeveless dress about 2 years ago.  What totally impressed me with this pattern was the approach using an over-lay pattern to trim down the pattern for accuracy after the tucks were sewn.
Let me explain.  There are twelve 1/4 inch tucks.  Now, think about the 'domino effect'.  If you are off  by 1/16" and multiply that by twelve.....  12/16" = 3/4 inch.   Allowing for the 'turn of the cloth' with each tuck is the problem.  If your fabric is very thin your accuracy will be better.

The directions have you prepare all your tucks and then place the overlay pattern to trim down to the perfect size.  GENIUS !!!    When a quilter makes a 12 " block they use a 12" square ruler to 'sure up' the block to the exact size.

I am making View A.  Tunic.  Mid-thigh length with sleeves.

Note:  Pattern is now Out of Print but can still be purchased at Club BMV as of March 2019.

If you flip through Ready to Wear Catalogs like Coldwater Creek this tunic design is extremely popular.

I made 1/4 inch bias tubes for the buttonhole loops  Turned them inside out with my tube turner.

 I just love sewing French Seams on light weight fabrics.  This cotton lawn was purchased from Sawyer Brook Fabrics in MA.


Next to the pencil mark you can see that I terminated the French seam and added a side vent about 5 inches deep.   (Pencil marks wash out.)


In an older post I showed all the steps.
Close up of the 1/4 inch tucks. 

This time around I made the design as a long tunic with 3/4 length sleeves.  I placed French seams inside the sleeves as well.  Looks nicer if you choose to roll up.  The pattern called for six button.  I added one loop more.  (7 button


Thursday, January 17, 2019

Happy New Year to Technology: Bernina Q24, Accuquilt Go Cutter, Epic....

My first project for 2019 !  Hope everyone has a healthy year filled with many sewing projects using all the latest technology!

Back in October of 2018 this little boy was being baptized at our church.  What a handsome little guy!  I really wanted to make something special for him.  I came across a really cute car fabric and it seemed so appropriate since his family has a car dealership.  SCORE !
As it turned out I was able to find several great colors that worked with this vintage car design.  I bought a ton of fabrics because I didn't know what I was going to create.  Left overs always find their way into other projects.

I scanned Pinterest for days trying to find pattern ideas.  And if you have a sewing buddy friend you can bounce ideas off one another.  The busy car print fabric forced me to keep things as simple as possible.

I pulled out my Accuquilt Go-Big electric cutter for the alphabet letters and the strips.  I also have the Accuquilt software with a blanket stitch for the lettering.   I must say,  these die cutters sure do a great job! If you have any arthritis or carpel tunnel issues these cutters are a blessing.


These applique embroidered car designs are a Floriani collection.
The charcoal dotted fabric looked just like pavement so I decided to make some roads.  Then of course we needed to add road stripes.  Ah yes, yellow grosgrain ribbon!  The black and white check fabric looked like those racing car flags. No, I didn't have a pattern.  Ideas just sort of evolve as you proceed.  I stopped at four cars because the quilt was growing quickly!
Naturally this created another opportunity for me to experiment with my Bernina longarm Q-24  with that fantastic computer automation.  Wow!!   I absolutely love that machine!!!!  I'm learning something new every time I have an opportunity to explore and play.   The quilt pattern I chose has circles and curves which reminded me of curvy roads and wheels.

I used my Floriani software to create a simple star design.  I uploaded the star design with the built in Wi-Fi on the Viking Epic.  This allowed me to fill in the blank areas around the lettering where I wasn't able to use the long arm.  (The long arm quilting would have stitched through the lettering.)  Hopefully there's a way to meet that challenge.  Time will tell.
Bernina Q-24 with Q Matic
So how long did this take to create ???  That question always comes from someone who does not sew and doesn't have a clue how involved these projects are.  The greatest gift you can give anyone is your time.  And believe me, this took quite a bit of time!  This also gave me an opportunity to learn more with all this technology.  ( Like the hangers? )