Thursday, December 3, 2020

Tree Skirt with Sashiko Quilting

 So, here I am living in a whole new area of the country for about 8 weeks now.  Naturally, priority number ONE is to locate all the best sewing stores.  Other retail services can wait.  I decided to sign up for a class in a fabulous quilt store to meet the locals, establish sewing contacts, and of course to find out where everyone goes to support their sewing habit.  So, I'm making a tree skirt with appliques using very traditional techniques.  The basic designs are from a booklet Dressed to Chill by Jan Kornfeind of Country Appliques.  Naturally I did my own thing.   Isn't that why we sew ? 


Class session #1:  After spending about 15 minutes tracing the applique designs from the pattern onto freezer paper I decided to do that task for homework.  I just couldn't 'hand -trace' and 'hand-cut' all those little pieces. (Don't drink too much coffee or your tracing lines will never be straight.)  I want faster results with straight lines. Is that too much to ask for ?  I took out that pattern sheet and made multiple photo copies of several designs and changed all the sizes to my preference.   Sometimes tweaking the size down to 90 percent makes a huge difference. 


Step 1- Making Fusible Appliques:  I am using Quilters Select Appli-Web Plus as my fusible web backing on the wrong side of the fabric.  Leave paper affixed to fabric.  Place the printed design to the RIGHT side of your fabric swatches and staple closely around the perimeter of the paper applique.  Yes, staples!  I really don't like getting stabbed with straight pins.  Place only one staple in the middle to hold the layers together. As you trim the design the stapled area 'falls off' eliminating the need to remove staples.  Only the one staple (in the middle) remains holding the layers together.  (I'm cutting out 3 layers of applique to save work because I don't know how many snow people I will make.)

I used a small rotary blade (28 mm) on most of the straight lines and the small scissors on any area that I couldn't get the blade to cut.  Cutting out the design on a flat surface is more accurate than holding the applique up in the air with your left hand trying to keep the paper from shifting on the fabric.   I feel a blade gives a cleaner more continuous cut.  Choose whatever you are comfortable with.

This tree skirt has 8 equal wedge shaped panels.  These panels can be pre-quilted if you wish.   I'm not a fan of pre-cutting a pattern shape if I plan on quilting the fabric. I prefer to cut out a rectangle of fabric a few inches larger than the pattern panel simply because the extra fabric can be hooped or free motion stippled.  Now you have something to grab on to.  After your fabric is quilted I would cut out the pattern piece.   This method also prevents wear and tear on the raw edges of the fabric if you chose to cut the pattern out in a traditional method. 

 I decided to try my Babylock Sashiko machine.  This machine ONLY uses a bobbin thread.  That's right, no top thread!  The surface produces an alternating hand-look running stitch while the underside is like a continuous line.  The stitch is meant to be viewed from the top side ONLY.   So, here's my chance to utilize this machine.   This machine can accept 30-100 wt. thread.  I am using Superior Thread 30 wt. -100 percent cotton. Perfect Quilter.  This will produce a more pronounced stitch.  I must admit, I do find the heavier threads more frustrating to work with because most machines tend to misbehave more frequently with specialty threads.  This has always been my experience on any machine.  And I find the cotton threads break more often. Make sure your cotton threads aren't too old.  My mother still has many spools of thread from the 60's.  Many suffer from 'dry rot' or 'sun rot' but she wont let me throw them out! 


I used Sulky's Totally Stable fusible paper strips for stitching guidelines.  Simply press them onto the fabric with your iron.  They can be re-fused multiple times before they loose their tack quality.    I have used this Sulky Totally Stable fusible paper to create perfectly straight tucks on shirts and dresses.  You can find the article in Threads Magazine 2019.


Here's one panel. 
It takes about 30 minutes to quilt each panel.  It would probably take about 30 minutes to free-motion stipple each panel.  I can stitch out one panel for each bobbin.  That means I need 8 bobbins of thread. 


The blanket stitch I used is a 3 ply stitch using 30 weight thread.  The stars were purchased at Joann fabric.  The subtle colors look like wood but they are actually plastic.  I sewed them on my Bernina 1230 with the #18 button hole foot.  Much to my surprise I was able to sew on those plastic snow flakes with the button hole foot too.  The holes were exceptionally tiny but the machine needle worked just fine for everything. 


I cut strips of 1 inch bias binding to create 1/2 inch wide strips using the bias tape maker.  I used 3/8 inch fusible Heat n Bond to fuse the bias tape into position over the seams between the panels.  This allows me to get the tape on much straighter if it is fused into position.  Keep in mind this does add stiffness but I'm ok with that on a home dec. project.  I avoid using these fusible products on garments because of the added stiffness.


I was hoping to use an edge stitching foot to obtain a nice straight line on the bias tape. The panels are sewn together with a 1/2 inch seam and then trimmed down to a scant 1/4 inch.  It is a challenge to press these bulky seams open and get them really flat.    The bias tape is positioned over this bulky seam.  Since it is not particularly flat the foot may not feed at a level position.  Feet are not  designed to tilt sideways nor can they climb.  (like hemming the leg of a pair of jeans)   I needed a foot with a wider opening on the base to straddle the ridge. These are Viking feet.  I sewed very slowly with a 3.0 stitch length.  What a difference when the foot is completely level !!!    I wasn't able to use the foot with the flange.  


Note:  I still haven't mastered this new platform on this blogger page.  I would like to put two photos side by side to save space and it isn't cooperating. 


I actually got this finished before the holidays for this year!   I hope everyone is getting some pleasure from sewing considering all the changes and restrictions.  It's a wonderful skill to pass on to the next generation. 


Friday, October 23, 2020

Shoe Bags

It has been a while since I have posted anything.  I moved. I'm living in a much smaller home so I needed to get creative storage ideas.  I desperately wanted to use whatever I had in my stash as this home is just temporary.  (It took me a while to unpack some sewing stuff !   Boxes are everywhere ! )
I decided to make some shoe bags to help expand my new closet capacity.  I found Butterick 6869 in my pattern collection dated back to 1996.  I made the shoe bag precisely to the pattern directions.  My execution was perfect!   Then I went to put my shoes in the pockets and discovered only my flip-flops would fit !   The pockets needed to be 1- 2 inches fuller and quite possibly deeper in length.  My shoes are a size '6'.   What happens if you try to insert a size 10 shoe ?   


I used my 'Featherweight' bias binder # 160359 on my Viking Epic 2.  Yes, the short shank attachment fits the machine beautifully.  The results were absolutely perfect!  Couldn't be happier! 


The pattern suggested using metal grommets in the upper hem area.  In the past I didn't have good luck installing those metal rings.  I usually dented/smashed them with that attachment.  Besides,  how do you attach those holes to over-the-door racks?   I bought these metal shelf hook attachments and added metal 'D' rings .  This was definitely easier to attach !    In this photo you can also see a 'rod pocket'.  I inserted a wooden slat.  This helps to keep the bag flat against the wall surface.  The wood slats from window blinds are great for this purpose.  I couldn't find any wood slats in any craft store or home center.  They only carry wood dowel rods or square rods. 

Since the size of these shoe pockets are not working out as expected I added 1 and 1/2 inches to the pocket width for my next shoe bag.  Perhaps Butterick created this shoe bag pattern for childrens shoes. 

I purchased these metal hooks to attach to the wired metal shelving units in the closet. 
In this shoe bag I am using 3/8 inch cotton twill inserted into the 'gill slot' on the side of the #160359 short shank binder.
This is shoe bag number 2.   The pocket width is definitely much larger to accept a shoe with more girth.   I would consider adding to the length as well if you have a longer shoe or a man's shoe. 


And this is 'Stitcher'  my C.F.O.  (chief Fido officer)   


Hello to all of my sewing friends !   I sure miss my regular sewing/teaching routine.  Please feel free to contact me if you want to say hello or ask for help.  


Monday, June 29, 2020

Terial Magic on Knits

     I'm not a  huge fan of sewing with knits.  Knits curl, stretch, shift, drift, distort, sag, droop.... and ripple forward while sewing.  It's like trying to cut jello with a serrated knife.  They lack self-discipline.  I like well-behaved, on-grain, stable fabrics. Reminds me of teaching students all those years.   I had to get really creative with disciplinary techniques for all those children with creative mindsets.  The secret was to keep them so busy they didn't have time to think .   It's only a matter of finding tips, tricks and the latest sewing notions to cure what ails them.

     The challenge is to 'tame the beast'.  This may require testing a variety of threads, needles, and feet to see what will work with your fabric weight and your machine. The more sophisticated machines with dual feed, sensors and variable thread sensing tension systems may help.  Keep in mind that all super lightweight fabrics and very thick fabrics will be more challenging than mid-weight fabrics. 

 Given the fact that rayon and synthetic fibers are more predominant it is important to be mindful of their properties when stitching or pressing with an iron. Their inherent sensitivity always makes me select a cotton knit if I can get my hands on some. Cotton is somewhat easier to work with.   Many of the knits have (elastane) added which helps with resilience and body.   There is such a thing as too much lycra (in my opinion) which causes the fabric to have no draping properties.  Reminds me how my mother dried bath towels.  She would let them dry on a wooden clothes dryer.  When those towels were dry they could stand up in a corner by themselves to saying nothing about scratching your skin like using a sheet of sandpaper.  We didn't own a clothes dryer when I grew up.  Everyone hung their clothes outside or in the basement.  (And she didn't use softener in the rinse cycle.)  Now, can you visualize a fabric with too much body ???

Fabric(s): The process I am suggesting in the steps below is for washable fabrics. 
Pattern:  Loose tank style dress. 

Cutting The Pattern:   Use tons of pattern weights to hold the fabric and pattern in place so the pattern and fabric can't possibly drift on your cutting mat.  The weights I use are from a marine supply house that my sewing buddy gave me for my birthday.
This will keep the layers from shifting while you are cutting the seam lines with a rotary blade. Using shears means the fabric is being lifted from the surface. Pinning the knit doesn't stop the fabric from drifting between pins especially if the fabric is sheer.


Taming The Fabric:  Use a solution of Terial Magic Stabilizer in a spray bottle to spray the seam allowance area.  I use equal amounts of product to water.  Do NOT use the concentrated strength. It will be harder than cardboard if you do.   I spread each pattern piece on the shower curtain.  I lightly spray a solution of Terial magic along the seam allowances.  This stabilizer will 'lock' the stretch when the fabric has dried.  While it may be safe to use an iron to speed up the drying process on cotton fabrics like quilting cottons I do NOT recommend it on rayon .   Rayon is more 'heat sensitive.'  It may possibly damage /melt the fibers if the heat setting is too hot.  It's much safer to air dry.  The edges will curl when they come in contact with the moisture.  That's fine.  They will press out flat after drying.

Sewing Option#1: Sewing knits on a serger is definitely faster and often eliminates many of the stretching issues.  Differential feed also helps. 
Sewing Option #2: Many people who do not own a serger can still obtain excellent results with their domestic sewing machine.  The problem many people experience is with the two layering shifting forward and stretching as they are seaming.  The two layers do not move evenly.  The feed dogs of the sewing machine are working the lower layer.  If you happen to own a sewing machine with the integrated dual feed function then you definitely want to engage this feature to activate the upper feed system.  
Sewing Option #3: The Even Feed  Quilting foot can be somewhat helpful as well.


Additional stabilizing step:   Use strips of sheer fusible interfacing to stabilize the armholes and neckline and hemline.  This extra step helps to prevent these areas from stretching out of shape.


This is a SELF-LINED bodice. It's safer to use the same fabric because they will shrink at the same rate.  Also, if the fabric peeks out to the public side it will not be noticeable.

  Step One:  Stitch the neckline twice.  Place the second of stitching directly on top of the first line.   ( A triple stitch function may cause the fabric to stretch because the machine is moving back and forth.  So that's why I sew two separate lines.) 

Sewing on a 1/4 inch wide strip of silk organza is another great technique if you do not want to use the fusible interfacing.
If your fabric is heat sensitive or bulky this is very effective.


Step Two:  This technique is known by many people as the Burrito Method.

Roll up the garment from the armhole toward the opposite arm hole.  Stop when you are about two inches from opposite armhole.  It will look like a long tube.
Bring one layer of the armhole over the tube.  Notice how there is a bulge in the strap.  One shoulder seam is rolled up inside the other shoulder seam. The line of pins are placed to keep the garment from travelling into the armhole waiting to be stitched.


Also, take note that the edges are uneven.  The bodice self lining is showing 1/8th inch beyond the outside of the garment. I am purposely applying a 'favoring' to these edges.  This will keep the bodice from peeking to the outside when the garment is turned inside out.  Clip in the curved area like you would do for a woven to keep the seam from wanting to bend/curl.


Turning the garment inside out:  You will actually pull the entire garment through the the shoulder seam.


Hem Line:  Stitch the HEM before the side seams.  Fold the hemline up about ONE inch.  Press.  Hemlines less than one inch may curl to the public view.  Hand baste near the raw edge.  This will keep the two layers from forward rippling as you stitch cross-grain.  This also serves as a guide line if you are using a COVER STITCH on a serger.  I have also sewn a hemline with straight stitches on my domestic sewing machine using Guterman Maraflex Stretch Thread with a 3.5 stitch length.  (I get this thread from WAWAK tailoring supply.)  The reason I am using this method is to avoid sewing the hemline in a circle.  While I do like that method this eliminate crossing over the side seams where many sergers will jam because the foot doesn't want to climb over the seam line.  This often requires a 'hump jumper' or a few layers of fabric beneath the back of the foot to make the entire foot level. This alternative method works very nicely if you have issues with your serger doing the circular method. The only trick is getting the two layers even at the bottom.  Basting cures that issue!

Side Seams:  Hand baste with a contrast thread the edges of the side seam allowances.  This will prevent the edges from curling and from shifting as you serge the side seam.  Make sure the hemline edges are even.  Lock them together with a strong basting stitch.


Viewing the side seam at the hemline: 
I  press the seam to one side and secure with a few straight stitches to flatten the
seam line.


Viewing the wrong side of the garment you can see the underside of the cover stitch.  Because I took the time to hand baste a guideline on the hem I was able to cover the raw edge more successfully.


Serger Seam: 
First I baste my raw edges to keep them from curling.  This will also keep the layers from shifting.  I am using a two-needle serger side seam.   Allow at least a 4 inch chain of stitches to run off the end of the seam at the hemline.  DO NOT CUT  THIS CHAIN of THREAD.   Use a hand sewing needle with a large eye.   Thread the needle hole with the chain stitches.  Insert the chain into the seam allowance to hide.


Monday, May 25, 2020

Have Covid Cabin Fever? I bet you I can make a 'Silk Purse from a Sow's Ear' by the time this virus passes !


     When it comes to any sewing project I just sort of create as I go.  I have a few general ideas in mind but nothing concrete.  I have to explore my stash to find possible coordinates, linings, trims, buttons, zippers, threads, etc.   After all, it would be a 'sin' not to use some of the stuff from shopping expeditions at those gigantic vending halls while attending Original Sewing and Craft Expos!  We gather like cattle to shop in those market places!  So, peruse your collection of treasures for your next project.  You never know when an item will say, '"pick me, pick me".   Admit it, we all spend days, even years fondling our treasured purchases just contemplating how to use them in a project.   And since we really can't shop locally for fabrics and notions during these months of confinement we should use what we have.

      When I cut out the fabric for the pattern I always wait to cut out the lining.  Since lining is one of the last steps it can wait until I know what I'm doing.  I like to see how the construction process goes.  Naturally,  I test out ideas on samples first before I take the plunge on the garment because I know I will make many changes when I see the results on samples. I will make thread color adjustments, stitch length adjustments, and needle type.  Yes, needle!  If I am top-stitching the garment I can get a nicer stitch with a straight stitch plate, straight stitch foot,  and needle with a larger eye !  If I have to make any fitting adjustments to my garment I don't want to repeat the same correction on the lining.  I will tweak my changes on the pattern before I cut the lining.
   
   Pattern guide sheets are intended to show you a chronological sequence of construction.  They are NOT attempting to show you the most appropriate seam finish nor can they suggest how to embellish beyond the basics.  The seam finish is determined by the type of fabric you have selected and the weight.  From that jumping point you can get creative with your own ideas.
      I  never make a garment and then go to the store for buttons.  I do that in reverse.  If the fabric is blouse weight I buy blouse size buttons.  If it is heavy weight I buy jacket size buttons.   I  buy gorgeous buttons to match the fabric and then I pick out a pattern to coordinate with the button size and style.  With all the patterns I have to pick from surely I can find one with the correct amount of buttons.  (Button and Notion Center, Rockville Centre, NY. is the BEST ! )

This is Vogue Geoffrey Beene 2195 and I am using a denim from Emma One Sock. 


Vogue 2195  inside view of jacket front with exposed pocket pouch.

     Quite often denim jackets are UN-LINED.  Some of the nicer  ready-to-wear jackets will have 'Bound ' seam finishes.  (see attachment below)
   

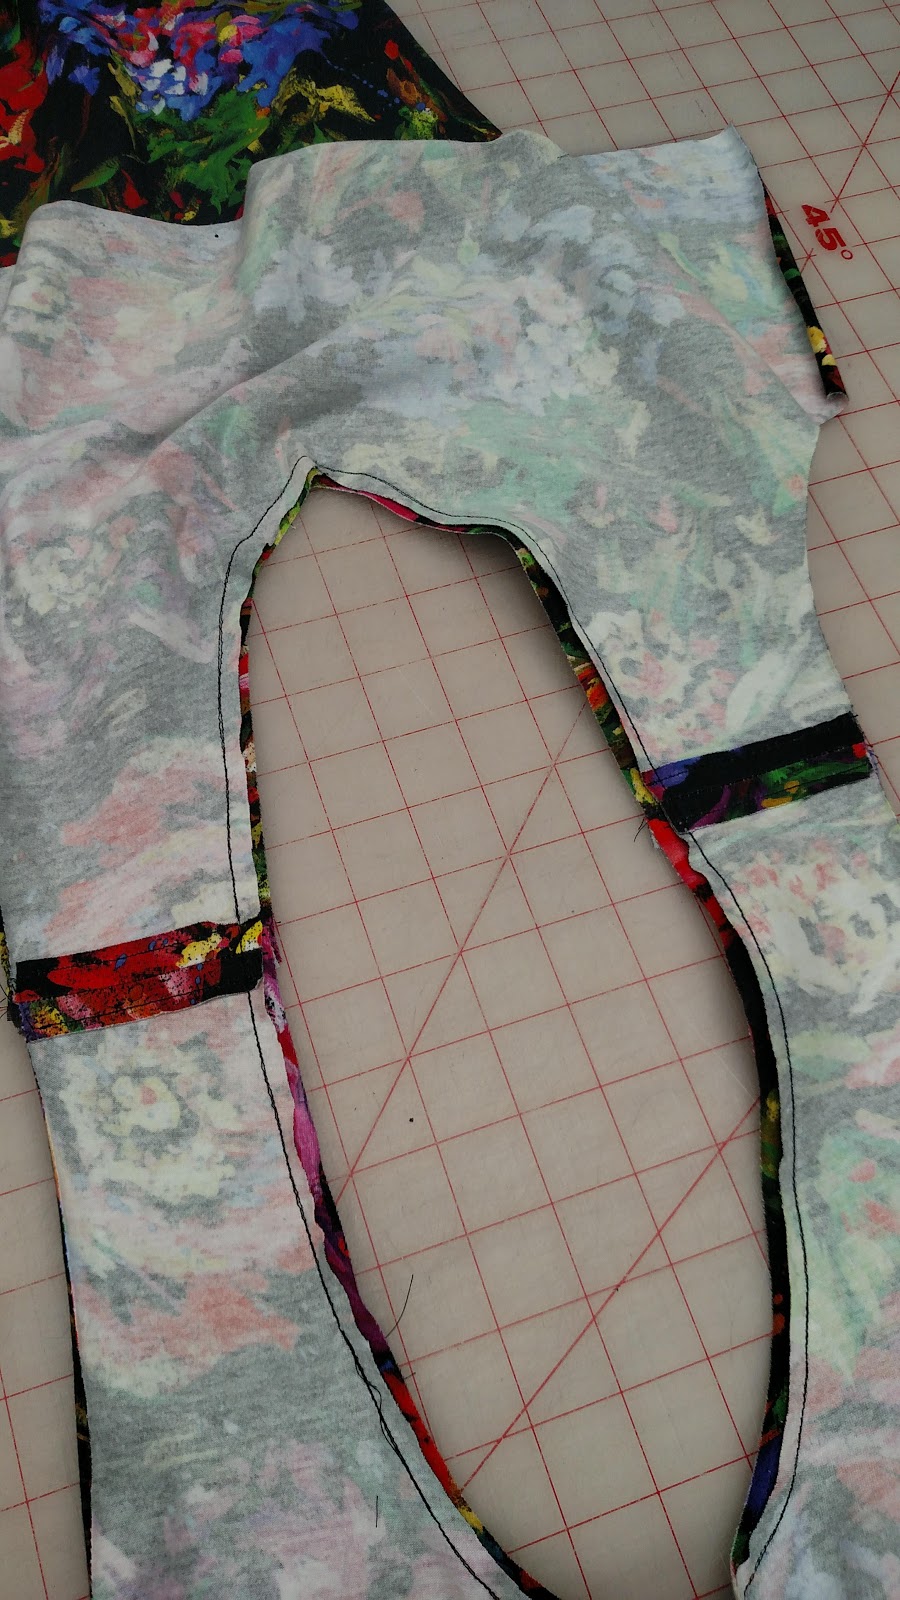
 The guide sheet illustration shows exposed pockets and minimal support near the zipper.  A full FRONT self lined facing will cure both these issues.

Easy fix:  Simply cut out two more pieces of the front panel like the upper yoke.
This is a bias binder to create BOUND seam finishes. 

BOUND seam finishes on a Bark Cloth cotton dress. 

This is my pocket welt. I use a light weight fusible to stabilize grain distortion. By using a trapezoid rather than a rectangle the side seams are rotated.  (This is also known as a Japanese welt.)


This is the interior view of the back.  The pattern does NOT call for a back lining.  It's very easy to create a lining by using the same pattern piece for the jacket.  I chose a cotton batik print because the jacket is denim.   If the jacket were wool I would have used a silk twill.


   When I cut this jacket out I had NO plans to add embroidery.  One of my sewing buddies suggested some embroidery.  (Don't you just love taking photos and texting with your sewing companions?  It's the best tool ever!)
      These swirls came from the Bernina Inspiration collection that came with 830LE.

     Normally I would stitch the embroidery onto the fabric BEFORE I cut out the pattern piece.  It's easier to hoop yardage than to figure out placement between seams and zippers.


     This beautiful cotton denim came from Emma One Sock in PA.  The quality is superb! So incredibly soft without the bounce back of lycra.  I'm not overly fond of lycra because the elastane alters the natural drape.  Every once in a while you may encounter the needle snagging the lycra causing a dot of white.  That makes me grit my teeth!


I had every intention of making button holes for the cuffs.  I tested out several button hole styles with different density and bead width.  What is especially nice about a Bernina button hole is that you can spread the bead width for a wider opening on thicker fabrics!  My Bernina 830 LE stitched out a gorgeous button hole.  When I cut the button hole open on my sample I decided I didn't want to see any of those little yarn whiskers.  And I'm not about to put on any liquid glue to stop fraying.  Those liquids discolor the fabric and create a crusty droplet!   That's when I heard a little gremlin in my head telling me to use snaps as the closure with a button on the outside.  (My #1 sewing buddy uses this technique all the time.)
The monitor isn't showing an accurate color . 


I am using the same printed Batik for a blouse. No buttons yet. 

By adding a full front facing the pocket is completely concealed and the zipper has more support.

During this time when we are spending most of our time at home with our families I am so very thankful I have a hobby that allows me to spend my time productive and creative.  It's even more rewarding when you can pass on the love of sewing to your children, grand children and friends in person or with the assistance of technology ! 


Wednesday, May 20, 2020

The Lost Art of Tailoring- Blending the Best of Both Worlds

   
     Any garment that requires lots of 'HAND' sewing seems to scare people away. (This is what students in classes have said.) Personally, any project that takes weeks or months to complete probably will not be on my bucket list anymore.  I like products and gizmos that make the task fast and perfect.  The tailoring process can be very time consuming and challenging if you choose to create the entire project with nothing but hand sewn methods.  I love the quality of traditional methods but I want it faster.  There are so many new products and
techniques available to speed things up.  I like to use traditional 'sew in ' canvas on strategic areas and fusible on the rest. (And your hand sewing skills can be sloppy because it's all on the inside !

  It may be difficult to find instructional materials with good visuals if you are trying to learn the process.  Most sewing people probably do not own text books on the topic (like I still have) but there are a few good tailoring books written by Adele Margolis.  Her books are still available on the internet.   Booklets written by Stanley Hostek on tailoring are available at Amazon.  His hand sewing skills are beyond amazing!  Claire Shaeffer and Roberta Carr are also good resources.

     Traditional 'Sew-In' type woven inter-facings have lost their popularity because people want faster results offered by fusible products.  I get it.  Try using HAIR CANVAS in strategic areas like a collar stand.  HAIR CANVAS provides a strong yet soft support that fusibles can't seem to replicate.  Again, stitching does not have to be neat.  Hair canvas panels on the front of a jacket or a coat will support the buttonholes and the area where the button are sewn.


Look how beautifully the collar stands up without collapsing!  Without the support from the canvas it will collapse and look shapeless.

  Fusible inter-facings available today are significantly better than the products we used in the 70's and 80's.  I try to combine the best of both worlds to speed up the tailoring process without sacrificing the quality of my work.  (Hair canvas is available from tailoring supply houses like Wawak.com located upstate NY.)

In the photo below I have fused a product called  'Grid-Weft'.  It is a very loosely woven fusible mesh  designed to beef up a limp or loosely woven fabric. On fabrics that ravel a great deal the fusible locks the yarns in place. This silk tweed is loosely woven and has a  significant amount of fluid drape weight.  The Grid - Weft will help to reduce shredding and stabilize the grain.  Regular fusible inter-facings tend to create a more rigid 'body'.
     After the mesh is fused to each pattern piece I mark all of my notches, darts, buttonholes etc. with contrasting colored thread for excellent visibility during the construction process.

The BLACK is the fusible GRID WEFT.


The horse hair  (hair canvas ) is attached to the GRID WEFT with hand CATCH stitches to keep it secure.  The catch stitches on the edge of the hair canvas are stitched to the black Grid Weft to keep it from curling .

The dart was cut out.  The edges of the dart were butted up together .  Then a strip of silk organza was placed over the cut edges and they were zig-zagged together.  This eliminates the bulk of the dart yet still provides shape of the dart.  Also, notice how the horse hair canvas is NOT incorporated into the seam allowance.  There is a strip of TAN silk organza that is sewn to the canvas and then the silk organza is sewn to the fabric.  It is important to keep the canvas away from the seam allowance because it will add tremendous stiffness and you will not be able to press the seam open.

The catch stitches on the edge of the hair canvas are stitched to the black Grid Weft to keep it from curling and flapping. The stitches do not have to catch the fabric but they can.
 The under collar has weft FUSIBLE interfacing applied to the fabric for body.   This is NOT the GRID WEFT product.  The under collar needs body and structure.  In addition to the fusible interfacing there is a portion of the under collar with the hair canvas.  This area is know as  a 'stand'.
The hair canvas has tiny catch stitches to keep it securely attached to the interfacing.   The stitches do not go through to the fabric.  You can also machine stitch a line of straight stitches at the fold.  Fusible hair canvas is another option for this step if you do not wish to hand stitch.


 In the photo above you can see how the hair canvas allows the collar to stand up beautifully on it's own.
 In the sleeve cap I added a 1 inch wide strip of bias mohair to give loft to the sleeve head.

Ready made shoulder pads are often made of foam covered with nylon.  I find these pads hard to work with.  The foam usually ends up tearing and crumbling.  The shape of the pad doesn't seem to fit right where it connects to the armscye of the sleeve.  The curves are in the wrong places.

See how the pad is shaped ?  That's because each layer was sprayed with 505 temporary spray adhesive and shaped on the shoulder of my  mannequin.  You can even do it on your own shoulder.
Making your own shoulder pads are incredibly easy to make.   I shape a few layers of hair canvas and a couple pieces of cotton flannel .  You can add fleece depending on how thick you want them.  Then I stitch them together with a few loose stitches since the spray glue is temporary.  Because these are fabric and not foam they will stitch to the seam allowances beautifully.  This size shoulder pad provides gentle structure and support without looking like football shoulders.


This silk tweed fabric came from Sawyer Brook,  MA.