The Sewing Workshop Collection has several
very loose fitting tops that fall into the wearable art styles. I'm working on the Japonesque Top this week. I cut this on the Small size. Wow, this is very loose-fitting! My salt and pepper fabric was left over from a dress so this is an experiment.

I rarely follow the guide sheet directions simply because they usually use serged or 'turned and stitched' methods which aren't as polished as French seams or flat fell seams. Secondly, I stabilize both the cross grain and bias grain whenever possible to keep the fabric from stretching out of shape with silk organza or fusible interfacing strips. Pattern companies rarely suggest any additional steps to stabilize grain. Years ago pattern companies supported 'stay-stitching' procedures. They tend to omit extra steps whenever possible. I felt the vertical and diagonal placket areas needed to have a little support from super light weight fusible interfacing. Then, just to complicate things even more I wanted a clean finish. I combined these two procedures using fusible interfacing. Sounds a little confusing but it's not that bad. I
sewed on strips of
fusible interfacing using a 1/4 " seam allowance. Then I
under stitched the fusible interfacing on the seam line to create a nice crisp edge. Then I folded the fusible interfacing toward the wrong side of the fabric and bonded the two together.

On the curved facing piece you can see I stitched a 1/4 inch seam. Trim down to 1/8 inch. Because the interfacing is
fusible the seam allowance
can not be pressed open.....therefore it requires a line of
under-stitching to press the seam flat.
Next, I fused the interfacing and then trimmed off the excess.
This is much easier to handle and fuse than having the fusible interfacing cut to size.
This certainly is not the typical method of fusing.
Now the edges are 'clean finished' and I don't have to add ugly serger thread!
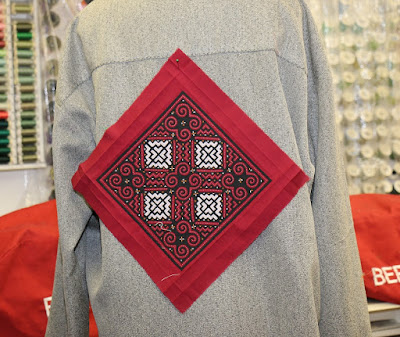
I have these absolutely beautiful Hmong hand made patches that I have been trying to incorporate into a garment. I have it pinned just to audition it.
I normally make a muslin if the garment is fitted. No, I didn't make a muslin because this is a super loose design. Dropped shoulders are definitely
NOT flattering on my frame. The sleeve cap hangs more
than four (4) inches from the actual shoulder! I look totally lost in this loose fitting design. It actually looked better when I held my arms out straight like the black and white graphic on the envelope!. That's fine if you want to stand like a scare crow all day. Perhaps this design would be more flattering on someone with a larger frame. The photo on the envelope looks a great deal more flattering than it does on me. It looks like a tent after a rain storm. I think I should stick to patterns that are more proportional to my height and frame.
Not every garment is going to be successful or flattering. You can walk into a dressing room with a half dozen garments and walk away with nothing. Sewing is no different. I know I will not wear it. It will just hang in the closet. I can easily cut this up and re- cut it into another garment. I'm thinking of a Vogue 1316 Rebecca Taylor dress at the moment. (I don't want to waste the fabric.)

I learned a few things here:
1. Don't go by the image on the pattern envelope! 2. I should stick to extended shoulders as opposed to dropped shoulders.


