Sunday, November 25, 2018

Working With Heavy Coating Fabrics.

This Burda jacket pattern was included as a supplement to Husqvarna  Viking Zig -Zag Magazine, Volume 9.  (These are still available on Ebay and Etsy)
I am making this indoor/ outdoor sweater coat for my Mom.  She's 92 and really feels the cold. She dresses in multiple layers. Hopefully this will keep her toasty warm!


I bought this beautiful wool coating stripe from Banksville Fabrics (Norwalk, Ct.) November 2018.  Thick coating fabrics can be very difficult to stitch if you choose a pattern with too many design features.   Avoid darts, tucks, shoulder pads, front facings, extra seams, welts etc.  Keep it super simple!   I didn't even put on the patch pockets.

(I didn't add the wool braid to the sleeve hemline because I don't know the exact sleeve length until she receives this gift. The hem is 2 inches deep.)

I decided to allow the flannel backed lining to hang freely at the hemline like you often see with rain coats. When a lining is attached to the bottom hemline it may pull or pucker if the length isn't exact.  This method eliminates a possible bagging.  I used a silk twill and my bias binder to finish off the lining hemline. 


I used heavy duty Gutermann Upholstery thread to create the French Tack between the seam allowance and the lining.  This will help to keep the lining from creeping up. 

I tested every possible buttonhole option.  I couldn't get a key hole to look good.  I tweaked the density and buttonhole bead width on every buttonhole style.  I ALWAYS test buttonholes to get the correct recipe.  Every fabric will be different.   My Bernina 830 and 790 have the capacity to spread the buttonhole beads!  LOVE, LOVE, LOVE those Bernina buttonholes!   This test sample pictured below goes to show you it takes some effort to find the right stitch combination.   I placed black silk organza on the top to flatten the texture and add strength to the buttonhole.  It doesn't even show when trimmed down! 

These buttons came off my Vogue Geoffrey Beene jacket that I made 20 years ago! 
  This wool fold-over braid was the perfect finishing touch.   No bulk from facings! 

Enjoy those toasty warm winter fabrics.  Keep it simple!  Good luck.  


Thursday, November 8, 2018

Super Easy Nightgowns

I have made this tank nightgown at least 15 times!  There is no commercial pattern for this tank gown.  I had an old worn out ready-to-wear gown that I cut up and used as my pattern; except I made it longer.


 A yard and one half makes an ankle length gown.  I find the longer length doesn't creep up as much when I flip in my sleep. 


The cotton fabrics are from Banksville Fabrics in Norwalk, Connecticut.


The 'Stretch' thread is from Wawak sewing supplies upstate New York.  The 'stretch' thread is Gutermann Maraflex #120.  This is NOT a wooly nylon.  It is a very strong, stretch thread that works beautifully in the needles of the serger.   This thread really keeps the needle threads from popping.  I highly recommend it.  This thread can not be compared with typical serger cone threads.

I have tried using self-fabric neck and armhole bindings but the fold-over elastic (5/8 inch) consistently produces necklines that maintain the best shape.  Fold over elastics are available in a variety of widths.  These are readily available on Etsy and Ebay at great prices.    The tiny flower lets me know the front from the back in case I'm too tired and put it on backwards.  Yes, that has happened when I didn't turn the light on.


I hand baste the fold-over elastic to the neckline because this eliminates issues with the elastic feeding the fabric inconsistently.  Sewing machines have a way of making the layers push at different rates.  No waves or puckers when you  hand baste.  Also, I off set my seams to the back of the armhole so there is NO bulk at the underarm side seam.   I use a 1.5 width zig-zag stitch on the raw edge of the elastic. 

My side seams were sewn on a two-needle/ 4 thread serger using the Gutermann 120 Stretch thread with Gutermann E382 Wooly Nylon in the lower looper.  This makes the horizontal looper threads soft against the skin.   (threads from Wawak.com )

This photo above is the inside of the hem showing how the wooly nylon is used with the Baby lock Cover Stitch.   (below)  This is a 'stand alone' cover stitch machine.  So, yes, I am using two separate machines.  My Husqvarna Viking Huskylock 936  has a built in cover stitch but it is quite time consuming to convert to the cover stitch feature.  It's also frustrating to perform this task if you are bouncing back and forth between seams and hems.  Honestly, I don't like changing all the threads either !


And this is the cover stitch sewn on the Baby Lock cover stitch only machine. 

Saturday, September 22, 2018

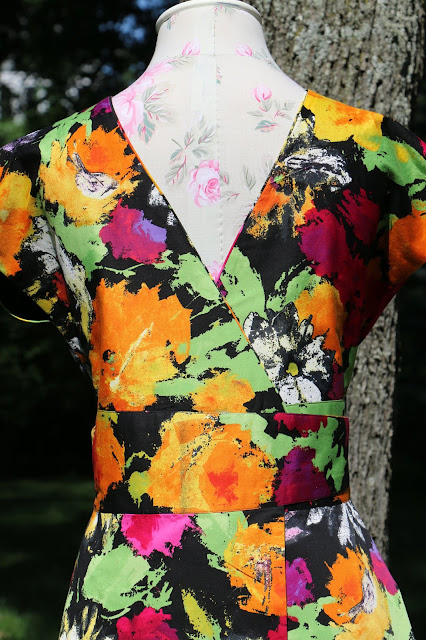
Look Mom.... No LOOSE FACINGS !

Whenever I have a neck band facing on a dress or a waist band facing on a skirt I like to attach a finished facing band directly to the LINING rather than attached separately at the seam allowance.  (To do this method you will eliminate the first step in the guide sheet.) 


 I like this method for many reasons:
  •  It looks cleaner
  • The facing doesn't creep to the public view side.
  • It doesn't need to be hand stitched in place.
  • The layering gives the grain more strength.  It doesn't stretch out of shape. The black batiste is still below the printed fabric. 
  • The bodice lining totally covers the shoulder seams and the side seams.  

I eliminate this step from the guide sheet:   (Vogue Nina Ricci 1244)
Note:  The guide sheet illustration shows the underlining being attached to the fashion fabric.  The two layers are treated as one.  This method leaves the raw edges of the shoulder seams and side seams RAW.  The edges are completely exposed.  Under linings can be very tricky.  Anytime two fabric layers are sandwiched together 'as one' they can show slight puffs or blisters if they shrink at a slightly different rate during laundering.  


I start my facing process by 'block fusing'  interfacing to the wrong side of my fashion fabric.  Then I place my pattern piece onto my fabric and cut out my facing.  ( Yes, it already has interfacing fused to the fabric !)

To finish the raw edge of the facing I cut out 1 inch wide bias strips of my underlining or lining fabric.   This is a HONG KONG seam finish.


I cut out a separate bodice (front and back) in cotton batiste or cotton lawn.  The black cotton is NOT attached to the fashion fabric as the guide sheet shows. 
Use a temporary spray adhesive.  This should eliminate any forward ripple while stitching.  I find pinning to be unsatisfactory.  Stitch the facing to the black underling next to the Hong Kong seam finish. 


I prefer this Hong Kong seam finish to be approximately 1/8 inch.  I feel 1/4 inch is a little too wide.

I placed my neck band facing directly on top of the cotton batiste lining.  I 'stitch in the ditch' next to the Hong Kong seam finish.  This eliminates all hand sewing! 
  
Now the neck band facing and the underlining are considered ONE SINGLE UNIT.   I added piping to the neck band edge. In the photo below you can see the facing is machine stitched to the black under lining.  No hand sewing.
(The pink colored threads are my tailor tack tracings for the tucks.)


The guide sheet illustrates top stitching around the armhole.  I wanted to eliminate this line of stitching.   Also, I wanted to cover up the seam allowances.  

The illustration above shows hand stitching the facing to the under lining to keep it secure. 

The inside of the garment is completely finished.  No raw seams anywhere. 

The piping will prevent the diagonal back closure from stretching out of shape.


Friday, June 22, 2018

BERNINA Q24 with Q-matic ! Wow !

This past March I attended the Original Sewing and Craft Expo in Atlanta.  There were numerous long arm quilting machines on display for testing down in the vending hall. I played with this machine for three whole days.  The Bernina Q24 with Q Matic automation was captivating!  Needless to say, when I flew back home I ordered the Q24 on a  12 foot frame with the computer automation from a certified dealer.  It took 3 men an entire day to set up this operation. I had no idea how involved it would be.  The software was loaded on the computer before they arrived with all these parts.  I can truly appreciate why you need a certified dealer.  Service is extremely  important.

Several of my friends were startled by this purchase because I am primarily a garment person.  Well, I think I better get sewing a few quilts.  This is a whole new adventure with the automation.

Stitch quality is outrageously important to me. (That's why I love Bernina)  I must say, the stitch quality is just beautiful !  The stitch regulator keeps the stitch size consistent.  The free motion work is so easy.  (This is really wonderful if your hands have arthritis etc.) There are tons of designs included with the software.  The computerized automation is just fantastic. Wow, wow, wow.  If you want to add more designs or create designs the Art & Stitch program allows for even more creativity.  Technology is amazing. 

I just finished the quilt top. This design is from Lunch Box Quilts.  I'll have this up on the quilt frame pretty soon. This dinosaur quilt top is for a very special 3 year old.  It will be finished before he goes to college thanks to automation.


This is my Pineapple quilt.  I added an extra row to make the quilt longer.  I intend on adding borders to make it larger .  I haven't sewn a quilt in 10 years.  I'm making progress.  Please pass on helpful tips! 


Done !     The Edge to Edge quilting on the frame is sooo much fun!   I can't imagine going back to quilting free motion with a standard sewing machine.  It's so much harder to push a large quilt through the machine bed. 


For an outdoor shot I decided to hang it from the gutter on the house !  I plan on placing this quilt on top of our queen size bed as a topper.  


Friday, March 23, 2018

Hemlines: Trouble With the Curve

Cutting Line Design New Release-   Danger: Curves Ahead.   

I'm already in the Spring sewing mode.  I know it is still March and we still have snow on the ground.  The daffodils are up about 6 inches now.  I have been waiting for an opportunity to use batik coordinates and this pattern is just perfect to add a contrast.  I will be making the tunic which pops over the head.   I held up the pattern tissue to determine finished length.  It actually covered my butt and then some because I am 5' 2 ".   I decided it was best to shorten it 1 1/2 inches so I wouldn't be sitting on buttons.


The suggested hemline finish is pretty much standard; add a gathering line and pull the bobbin thread to gather.  This method works rather nicely on softly woven fabrics like rayon challis.  I am using a crisp cotton batik and know from experience that a tightly woven crisp fabric will produce tiny, hard bumps at gathering points.  Additionally, the curved areas can be prone to 'cupping' because they are in a 'bias zone'.   

(Serger thread can add bulk as well. )


I decided to use a French bias strip which is smooth, adds a touch of body and looks cleaner.


There are two rows of top stitching around the neckline and armholes placed 1/4 inch apart which adds a nice touch.

Personally,  I feel the curved hemline is more flattering across the hip line. 

This went together beautifully.  Nice design. 

Tuesday, March 6, 2018

Vogue 9293 Screams Spring in Hyacinth Purple Stripes.

This Vogue 9293 dress reminds me so much of Vogue Nina Ricci 1244 from the year 1975.   The bodice and cap sleeves are quite similar.  I have noticed quite a few designs from the 70's making a re-appearance.  I still have most of my patterns from the 70's and 80's.  It pays to hold onto your patterns.  Many of them are still available on Ebay and Etsy.  I still think the guide sheet directions were better in those days.  The Nina Ricci design is a back wrap dress.  I made that pattern at least five times.


I purchased this high quality purple and white shirting from Banksville Fabrics in Connecticut.  They may still have this in stock. Stripes can be very attractive if you take the time to plan out a design. (Otherwise they can make your eyes go crazy!)

My college textiles professor said, " people usually select a color or pattern as shown on the envelope."   Oh, how true.

Bodice alteration:  Pattern companies design the upper bodice to fit a 'B' cup.  The greater majority of dress patterns do not offer multi-sized pre-printed cup sizes to date.  Slowly but surely they are showing up in the pattern books. Typically these cup variations are for the princess style bodice.  Bodice patterns with side and waist darts require a different approach which scares off  too many garment sewing people.  I used white cotton lawn to underline the entire bodice.  I used the same white cotton to make French bias strips for the cap sleeve edges.

The bodice on the Vogue 9293 is a two-piece over-lap with two darts on each side.  The Vogue Nina Ricci 1244  has three small tucks on each side.  This may appear to be a slightly more involved alteration at first glance but it's really not hard at all.  Simply slice horizontally from side seam to side seam on the lengthen and shorten line. Leave the side seam in tact as a hinge point.  You do NOT want to reduce the side seam length.  To reduce the bodice cup size pretend you are taking a small tuck across the bust to remove excess volume.  Overlap the horizontal lines near the center by 1/4- 3/8 inch.  To increase cup size spread the pattern apart .


The small darts are covered by the tie which works out nicely.


I was able to make a French seam on the center front and still match up my stripes pretty well. Just love those Bernina feet with the side flange for perfectly straight seams.


Thursday, March 1, 2018

Signs of Spring

My daffodils are already 4 inches high and today is March 1, 2018 !  Spring always motivates me to get sewing on some brighter fabrics. 


Vogue 8997 has proven to be a very successful pattern for a few reasons;  the bodice pattern comes printed in a variety of sizes which means no alterations !   Zipping up the back of the dress is so much easier because I can actually reach the zipper with the lower back neckline.


I have made this dress in linen, cotton sateen and cotton voile.  Of course in cotton voile the entire dress needs an underlining.


The two-piece sleeve is such a pleasure to install because you don't have to worry about a 'flat cap' or  extra easing. The seam allowance in the middle eliminates about 1 1/4 inches of fabric at the shoulder seam.  Setting in a one piece sleeve can be a daunting and frustrating experience getting the ease distributed smoothly.  A poorly installed sleeve can scream 'home-made' as opposed to 'custom made'. And yes, I hand baste the sleeve unit into the armscye to avoid stitching with pins.  The sleeve unit has the cotton lawn lining.


This is the bodice front.  I match my notches.  Clip my curved areas to allow the fabric to bend gently to the side bodice.  I hand baste with a contrast thread at 1/2 inch.   Pins do NOT lock the fabric effectively like basting.  Stopping to remove pins also interrupts the continuity of the stitch line. Stitch from the bottom to the top on both units .  If you stitch from top to bottom on one side the final results usually look somewhat distorted.  An 'unbalanced' look at the bust line isn't attractive.


I underlined the entire bodice with a fine cotton lawn.  Underlining the bodice helps to prevent the underarm area from discoloration from perspiration and deodorants.

An underlining makes everything cleaner .

An underlining adds subtle structure.

(sleeves are lined)


This dress has a full skirt which is similar to sewing a round tablecloth.  A Ban-roll hemline will totally eliminate the forward ripple on the cross grain. 


This fabric came from Banksville fabrics in Connecticut. They have a fabulous website.  Their staff is great!

 Cotton sateen with a small amount of lycra.  The full skirt is fluid. Too much lycra can dramatically increase body taking away from fluidity.


Friday, February 16, 2018

DIE CUTTER APPLIQUE

It has been a long time since I have done any applique work.  I remember putting appliques on my son's clothes when he was a toddler and of course on pillows, home decor or small blankets.  I don't believe I ever put large appliques on my own clothes. 

Back in the day there was only one way to cut appliques- by hand!  Now we have die cutting machines, laser cutting machines and the cutting needles in our sewing computer machines.  I have tried all these methods and they all have specific advantages and disadvantages which depend on the intricacy of the design.  I don't mind cutting out simple designs by hand.  The price is right!

I used my Accuquilt die cutting machine to cut out the alphabet letters for these pillow cases.  I applied Heat and Bond light weight fusible to the wrong side of the fabric with the paper still attached before I cut out the shapes.  The results were very, very clean.  From there you either stitch them on manually with a decorative stitch which is quite tedious or you purchase  the coordinating software to stitch out a placement line and the decorative perimeter stitching.  The end results are very professional.  If you prefer the look of hand stitches then the manual method may be more to your liking. Thankfully my sewing machine has the 'hover' feature which makes the manual method a great deal easier but I still find the process quite tedious.  The Bernina 'knee lift' is also a great help.


My 'Cut Work' software program allows me to use the cutting needles within the sewing machine to cut out the letters.  The fabrics must be stiffened and stabilized to achieve a decent cut.  The cutting needles perforate the fabric like the tiny perforations on bank checks.  The final appearance is not as clean as a die cut but can still be covered up nicely with an appropriate decorative stitch in the software program.  There are numerous stitches available to pick from.  It's a matter of testing out a few of the stitch options to see which covers best for your fabric choice. The final results can be just as clean with the right stitch.  Next time around I will experiment with different style fonts in my Cut Work software program.  The letters above are simply arial . 


I made pillow cases for two little boys and placed their names on the side hem.   I also added a very light weight fusible interfacing to the wrong side of the fabric to support the appliques which worked out nicely.   I'm sure these new pillow cases will make bedtime more pleasing! 

Our sewing world continues to grow every day with all these new toys to make things more fun !  The end results are really great !